5.3L Engine Rebuild Page 7


Figure 25. Install the lower bearing halves in the caps, then place the caps on the studs. These are ARP 234-5608 Main Stud Kit. Follow the instructions for installing
them which are available on ARP's website. Lubricate the stud threads and the nut flanges with the ARP 100-9910 Ultra Torque Assembly Lubricant
, then torqued them down
as per the instructions. Now take everthing apart again and check the Plastigage
. Clean the Plastigage
off the journals and bearings, then remove the
crankshaft.
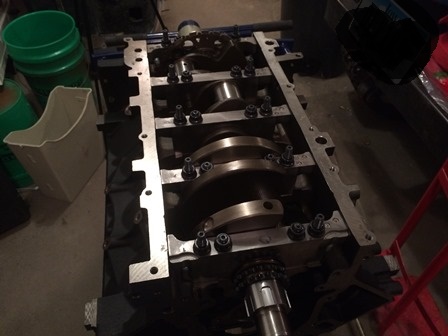

Figure 26. Lubricate the bearing halves with Clevite 77 2800B2 Bearing Guard. Place the crankshaft back in the block. Re-install the main caps. Re-install the main
stud nuts. Follow the sequence in the instructions provided with the studs. The center nuts are torqued to 60ft lbs. The outer nuts are torqued to 50ft lbs.
The side bolts are prepped with RTV silicone, and torqued to 28 ft lbs. The crankshaft is now installed. It spins very nicely.


Figure 27. One thing to do that is a must, is bag the engine when done working on it for the day. This keeps dust, dirt, and moisture out of it, all of which are bad things for an engine. The Moroso 99400 Engine Storage Bag is just for engine storage.


Figure 28. We now move on to Sealed Power H1132CPA Piston and connecting rod assmebly. Here we see all the components, the piston, the connecting rod, the piston pin, and pin
retainers. The rods and pistons are directional. the dimple in the top of the piston faces the front, and the wider flat on the rod bearing end faces the
front as well. This is the 12649190 Gen IV Floating Pin Connecting Rod
.
| Pages: 1, 2, 3, 4, 5, 6, 7, 8, 9, 10, 11, 12, 13, 14, 15, 16, 17, 18, 19, 20, 21, 22, 23, 24, 25, 26, 27, 28, 29, 30, 31, 32, 33, 34, 35, 36, 37, 38, 39 |
| <--Previous | 5.3L Engine Rebuild Home | Next--> |
| Contact: Copperhead | As an Amazon Associate I earn from qualifying purchases | © 2019 |